There are a lot of resources on how to migrate websites, so we won’t get into that, but here are the steps and a detailed explanation for when you need to update the DNS in your site’s move.
The following process is a good practice for anyone hosting websites as it minimizes website and email downtime or other issues like missing requirements or settings based on records that improve email deliverability (like SPF, DMARC records) or verification (like TXT records) or subdomain related records you may not have thought of.
1. Make sure you have everything you need to migrate the site from the previous hosting company or developer:
- domain registrar access
- wp-admin access with admin level permissions
- a migration plugin like WP Migrate or FTP and MySQL access
If you’re not able to get wp-admin access, you can still manually move the site with FTP and MySQL database (phpMyAdmin) access to download the site files and a database .sql dump. If you’re provided with hosting access, you can create these credentials yourself to access FTP and phpMyAdmin.
Aside/warning: As soon as you have everything you need to move the site, you should try not involve the previous developer in any future steps. You don’t want to ask them to do anything else because you don’t want someone you don’t know making DNS changes when you’re tasked with moving a site and have everything you need to do it. A lot can go wrong, and a lot of WordPress developers have a very limited understanding of how DNS works. You wouldn’t want them to make a mistake or change a configuration that would result in unnecessary downtime that the client may end up blaming you for, and they should! Because you’d be at fault for asking the previous developer to change something when you didn’t need them to.
2. Identify the current records to migrate
If you already have DNS access, great. You’ll just need to add your CNAME or A record.
But if you’re migrating the DNS as well, you want to investigate yourself what all records need to be moved to ensure you don’t miss anything. All the existing records are public information and easy to query. Some tools like Cloudflare even automatically pull existing records in so there is zero downtime.
Key records includes NS, MX, A, TXT, etc., and any subdomains. We use https://mxtoolbox.com/SuperTool.aspx for an initial lookup and https://hackertarget.com/find-dns-host-records/ to double check for any subdomains we may have missed.
You also want to do the following due diligence:
- client discovery to make sure you aren’t missing anything, (eg. asking what they use for email. Sometimes they will have switched email providers but left the old MX records intact, so this ensures you don’t migrate the wrong ones, etc.,)
- wp-admin discovery (is there SMTP plugin or email configurations in other activated plugins?)
3. Add the current records to the new DNS editor
Instructions for adding records are super clear, but often specific to the registrar or DNS manager, so check their docs. As long as you don’t miss any records, there will be no downtime in the next step.
You may need to add new records immediately to verify ownership of your domain or take control of tools like Google Search Console so make sure you have those added as well.
4. Update the name servers to point to your new DNS
This step is the most important. It’s when the big migration switch happens. It will give you full control of the DNS and ability to add any new records you may need to verify ownership of your domain.
- Before you make the switch you’ll want to make sure the TTL (time to live) is as low as your DNS manager will allow, often provided in seconds as 3600 be default and some can be updated to as low as 60 seconds or immediately.
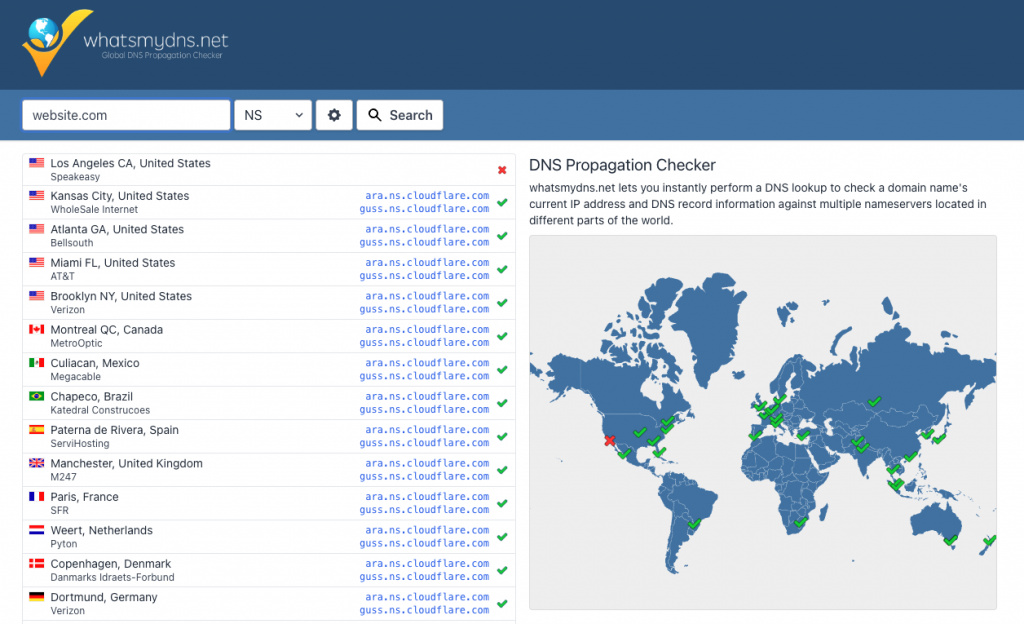
- Before you make the switch you’ll also want to check the DNS propagation. We use Express VPN to log in to different cities across the US and ping the site via Terminal and we use https://www.whatsmydns.net/ and https://dnsmap.io/ to see that the propagation has happened. Both tools show the name servers as they appear as pinged from servers across the world:

Once you have that recorded, update the name servers to point to your DNS. This is domain registrar and DNS manager dependent so check their docs for how to specifically update the name servers.
5. Wait until that change propagates to all servers and confirm that the name servers been updated
Use the above DNS propagation map tools to watch as the name servers change and you can also do a DNS lookup to see that the name servers have updated and that your records are in place. We use https://mxtoolbox.com/SuperTool.aspx for that.3.
6. Once the changes have propagated update the relevant records to point to your new site (which should be ready to go live)
Typically the hosting company will provide specific instructions to show you how to do this or a walkthrough wizard that will authenticate with your DNS manager’s account and inject the records automatically. We don’t like the latter option, too much can go wrong and we’ve had issues with accidental deletion of existing records unrelated to the website.
You’ll either edit the A record or CNAME record for the www and @ titled records.
A WPEngine manual migration note:
When you DON’T have install access for the old site’s WPE account
When manually migrating from one WPE account to another, you may need to add a TXT record to verify you own the domain, with the field saying something like wpe-verification=INSTALL . If you don’t have WPE account access for the old install, adding the domain in the Domains panel to the new install, having the same domain set for their install means there will be a duplicate domain notice. You’ll just need to open the link to confirm ownership or use support chat to have a technician mark the old site as having a duplicate domain. Once that’s done, you’ll just need to update the DNS to point to the new site/server. The details will be available in the “Domains” page.
When you DO have install access for the old site’s WPE account
If you have access to the old site’s WPEngine install, once you’ve updated the DNS to point to your new site, you can remove the domain from their account:
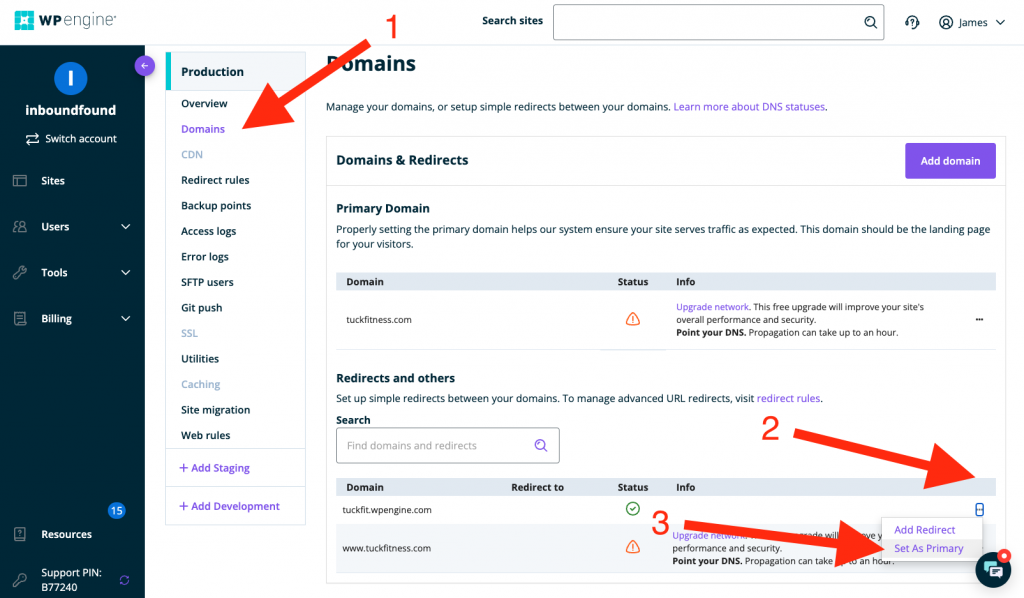
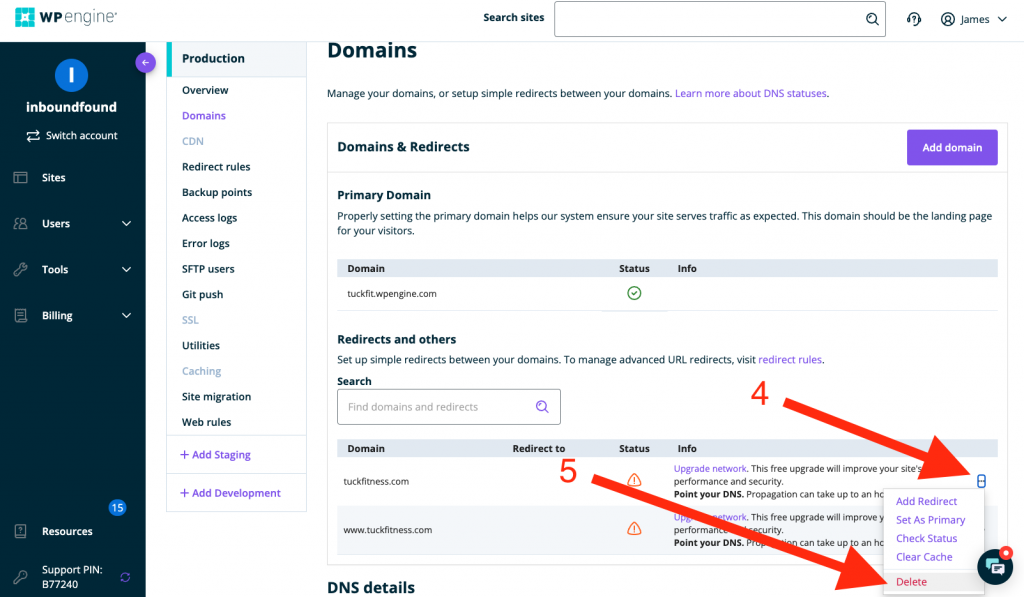
To do this you’ll first want to set the old-install.wpengine.com domain as the primary. WIthout this step you can’t delete the domain if it is still set as the primary domain. Once you’ve set the wpengine.com domain as primary, you can delete the live site’s domain from the Domains panel:


That’s it!